STM32 + SPI OLED SSD1306 + u8glib + CubeMX
As I promised, I post info about connection SPI-based display based on SSD1306 controller using STM32 CubeMX.
Its connection is even simpler then I2C one, due to absence of starting byte in sequence, which inform about data/command difference. In this display there is separate pin, which corresponds to this feature.
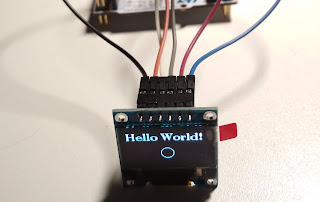
Let's start. I've used my custom board with stm32f103 MCU. This is final result:


Its connection is even simpler then I2C one, due to absence of starting byte in sequence, which inform about data/command difference. In this display there is separate pin, which corresponds to this feature.
Let's start. I've used my custom board with stm32f103 MCU. This is final result:

As I said, we need four pins to control the display: DC, CS, CLK and MOSI. DC and CS just setted as GPIO output, two others - used from SPI layer:

SPI configuration has default values. Ok, now we'll make the same things as we made in I2C display, here I'll describe only contains of files u8g_arm.h, u8g_arm.c and main.c files.
u8g_arm.c
 #include "u8g_arm.h"
 void u8g_Delay(uint16_t val)
 {
      HAL_Delay(val);
 }
 void u8g_MicroDelay(void)
 {
      HAL_Delay(1);
 }
 void u8g_10MicroDelay(void)
 {
      HAL_Delay(1);
 }
 uint8_t u8g_com_hw_spi_fn(u8g_t *u8g, uint8_t msg, uint8_t arg_val, void *arg_ptr)
 {
  switch(msg)
  {
   case U8G_COM_MSG_STOP:
    break;
   case U8G_COM_MSG_INIT:
    u8g_MicroDelay();
    break;
   case U8G_COM_MSG_ADDRESS:           /* define cmd (arg_val = 0) or data mode (arg_val = 1) */
    u8g_10MicroDelay();
    HAL_GPIO_WritePin(PORT, DC, arg_val);
    u8g_10MicroDelay();
    break;
   case U8G_COM_MSG_CHIP_SELECT:
    if ( arg_val == 0 )
    {
         HAL_Delay(1);
         HAL_GPIO_WritePin(PORT, CS, GPIO_PIN_SET);
    }
    else
      HAL_GPIO_WritePin(PORT, CS, GPIO_PIN_RESET);
    u8g_MicroDelay();
    break;
   case U8G_COM_MSG_RESET:
    break;
   case U8G_COM_MSG_WRITE_BYTE:
     HAL_SPI_Transmit(&SPI_HANDLER, &arg_val, 1, 10000);
     while(HAL_SPI_GetState(&SPI_HANDLER) != HAL_SPI_STATE_READY);
     u8g_MicroDelay();
     break;
   case U8G_COM_MSG_WRITE_SEQ:
   case U8G_COM_MSG_WRITE_SEQ_P:
    {
         HAL_SPI_Transmit(&SPI_HANDLER, (uint8_t *)arg_ptr, arg_val, 10000);
         while(HAL_SPI_GetState(&SPI_HANDLER) != HAL_SPI_STATE_READY);
         u8g_MicroDelay();
         arg_val = 0;
    }
    break;
  }
  return 1;
 }
u8g_arm.h:
 #ifndef _U8G_ARM_H
 #define _U8G_ARM_H
 #include "u8g.h"
 #include "stm32f1xx_hal.h"
 #define SPI_HANDLER hspi2 // use your SPI hadler
 extern SPI_HandleTypeDef SPI_HANDLER;
 #define DC GPIO_PIN_11
 #define CS GPIO_PIN_12
 #define PORT GPIOB
 uint8_t u8g_com_hw_spi_fn(u8g_t *u8g, uint8_t msg, uint8_t arg_val, void *arg_ptr);
 #endif
and part of main.c:
 #include "stm32f1xx_hal.h"

 /* USER CODE BEGIN Includes */
 #include "u8g.h"
 #include "u8g_arm.h"
 /* USER CODE END Includes */

 /* Private variables ---------------------------------------------------------*/
 SPI_HandleTypeDef hspi2;

 TIM_HandleTypeDef htim1;

 /* USER CODE BEGIN PV */
 u8g_t u8g;
 /* Private variables ---------------------------------------------------------*/

 /* USER CODE END PV */

 /* Private function prototypes -----------------------------------------------*/
 void SystemClock_Config(void);
 static void MX_GPIO_Init(void);
 static void MX_SPI2_Init(void);


 /* USER CODE BEGIN PFP */
 /* Private function prototypes -----------------------------------------------*/

 /* USER CODE END PFP */

 /* USER CODE BEGIN 0 */

 /* USER CODE END 0 */

 int main(void)
 {

  /* USER CODE BEGIN 1 */

  /* USER CODE END 1 */

  /* MCU Configuration----------------------------------------------------------*/

  /* Reset of all peripherals, Initializes the Flash interface and the Systick. */
  HAL_Init();

  /* Configure the system clock */
  SystemClock_Config();

  /* Initialize all configured peripherals */
  MX_GPIO_Init();
  MX_SPI2_Init();


  /* USER CODE BEGIN 2 */
  u8g_InitComFn(&u8g, &u8g_dev_ssd1306_128x64_hw_spi, u8g_com_hw_spi_fn);
  HAL_Delay(100);
  /* USER CODE END 2 */

  /* Infinite loop */
  /* USER CODE BEGIN WHILE */
  while (1)
  {
  /* USER CODE END WHILE */

  /* USER CODE BEGIN 3 */
       u8g_FirstPage(&u8g);
       do
       {
            u8g.font = u8g_font_profont22;
            u8g_DrawStr(&u8g, 20, 55, "Hello");
       } while ( u8g_NextPage(&u8g) );
    HAL_Delay(100);
  }
  /* USER CODE END 3 */

 }
So, that's all!


nice tutorial i'll try this today
ReplyDeletethank you very much !!!!!
This comment has been removed by the author.
ReplyDeleteIt's great. But my device don't work without command U8G_COM_MSG_RESET
ReplyDeleteWhat device do you have?
DeleteNow i'm doing tank level system for my motocikle base on OLED display, two HX711 sigma-delta ADC, two differential pressure sensors and STM32F103C8T6.
DeleteI think you can implement your own reset command.
Deletehi, thank you for your tutorial, i made u8g_arm.h and copy u8g.h to inc folder and also made u8g_arm.c but when i start to built, i receive a message : OLED SPI\OLED SPI.axf: Error: L6200E: Symbol hspi2 multiply defined (by spi.o and main.o).
ReplyDeletecan you help me and tell me what should i do? thanks for your time.
Could you please give me some more details about the .c files and .h files you used in this project?
ReplyDeleteWhat do you mean?
DeleteTo make it work I had to connect the reset line of the display to a GPIO and implement the reset command.
ReplyDeleteIn u8g_arm.h:
#define RST GPIO_PIN_10 // or any other free pin configured as output
and in u8g_arm.c:
case U8G_COM_MSG_RESET:
HAL_GPIO_WritePin(PORT, RST, GPIO_PIN_SET);
u8g_10MicroDelay();
HAL_GPIO_WritePin(PORT, RST, GPIO_PIN_RESET);
u8g_10MicroDelay();
HAL_GPIO_WritePin(PORT, RST, GPIO_PIN_SET);
break;
I took a lot until I saw your message,
DeleteSensational
Thank you
hi perfect project, can you send me project pls, i tried, there are a lot of errors, i cant find :(
ReplyDeleteSelain itu, Endymion Construction juga memiliki tim kontraktor yang berpengalaman dalam mengelola dan melaksanakan pembangunan rumah. Kami memahami bahwa konstruksi yang solid dan aman sangat penting, sehingga setiap tahapan pembangunan kami jalankan dengan teliti dan mengutamakan standar kualitas yang tinggi. Kami menggunakan bahan bangunan yang berkualitas dan memastikan bahwa proses pembangunan berjalan sesuai rencana.
ReplyDeleteKami percaya bahwa rumah adalah investasi jangka panjang yang harus dibangun dengan cermat dan hati-hati. Oleh karena itu, Endymion Construction selalu berusaha memberikan layanan yang transparan, tepat waktu, dan profesional. Dari perencanaan awal hingga penyelesaian akhir, kami memastikan bahwa setiap langkah dilakukan dengan penuh tanggung jawab.
Kami juga memberikan layanan konsultasi gratis untuk membantu klien merencanakan dan mendesain rumah impian mereka. Endymion Construction siap menjadi mitra yang dapat dipercaya dalam mewujudkan hunian ideal Anda di Medan. Dengan harga yang kompetitif dan kualitas yang tak tertandingi, kami siap mewujudkan proyek rumah Anda dengan hasil yang memuaskan Jasa Arsitek Medan